Friday, December 25, 2020

Master Closet Redo


One of the things that is great about our house is that there are two huge master bedroom closets. I had a really great closet at our old house and I was able to move everything right into this one and have plenty of room. I love all of the wood in the house, but we are really trying to move to using wood as more of an accent rather than the entire focus.

You can see that there is a lot of great storage space, so we thought that this would be a quick weekend job...paint the cabinets, change out the hardware, and paint the walls. As with everything else, it ended up being a little more than that. 

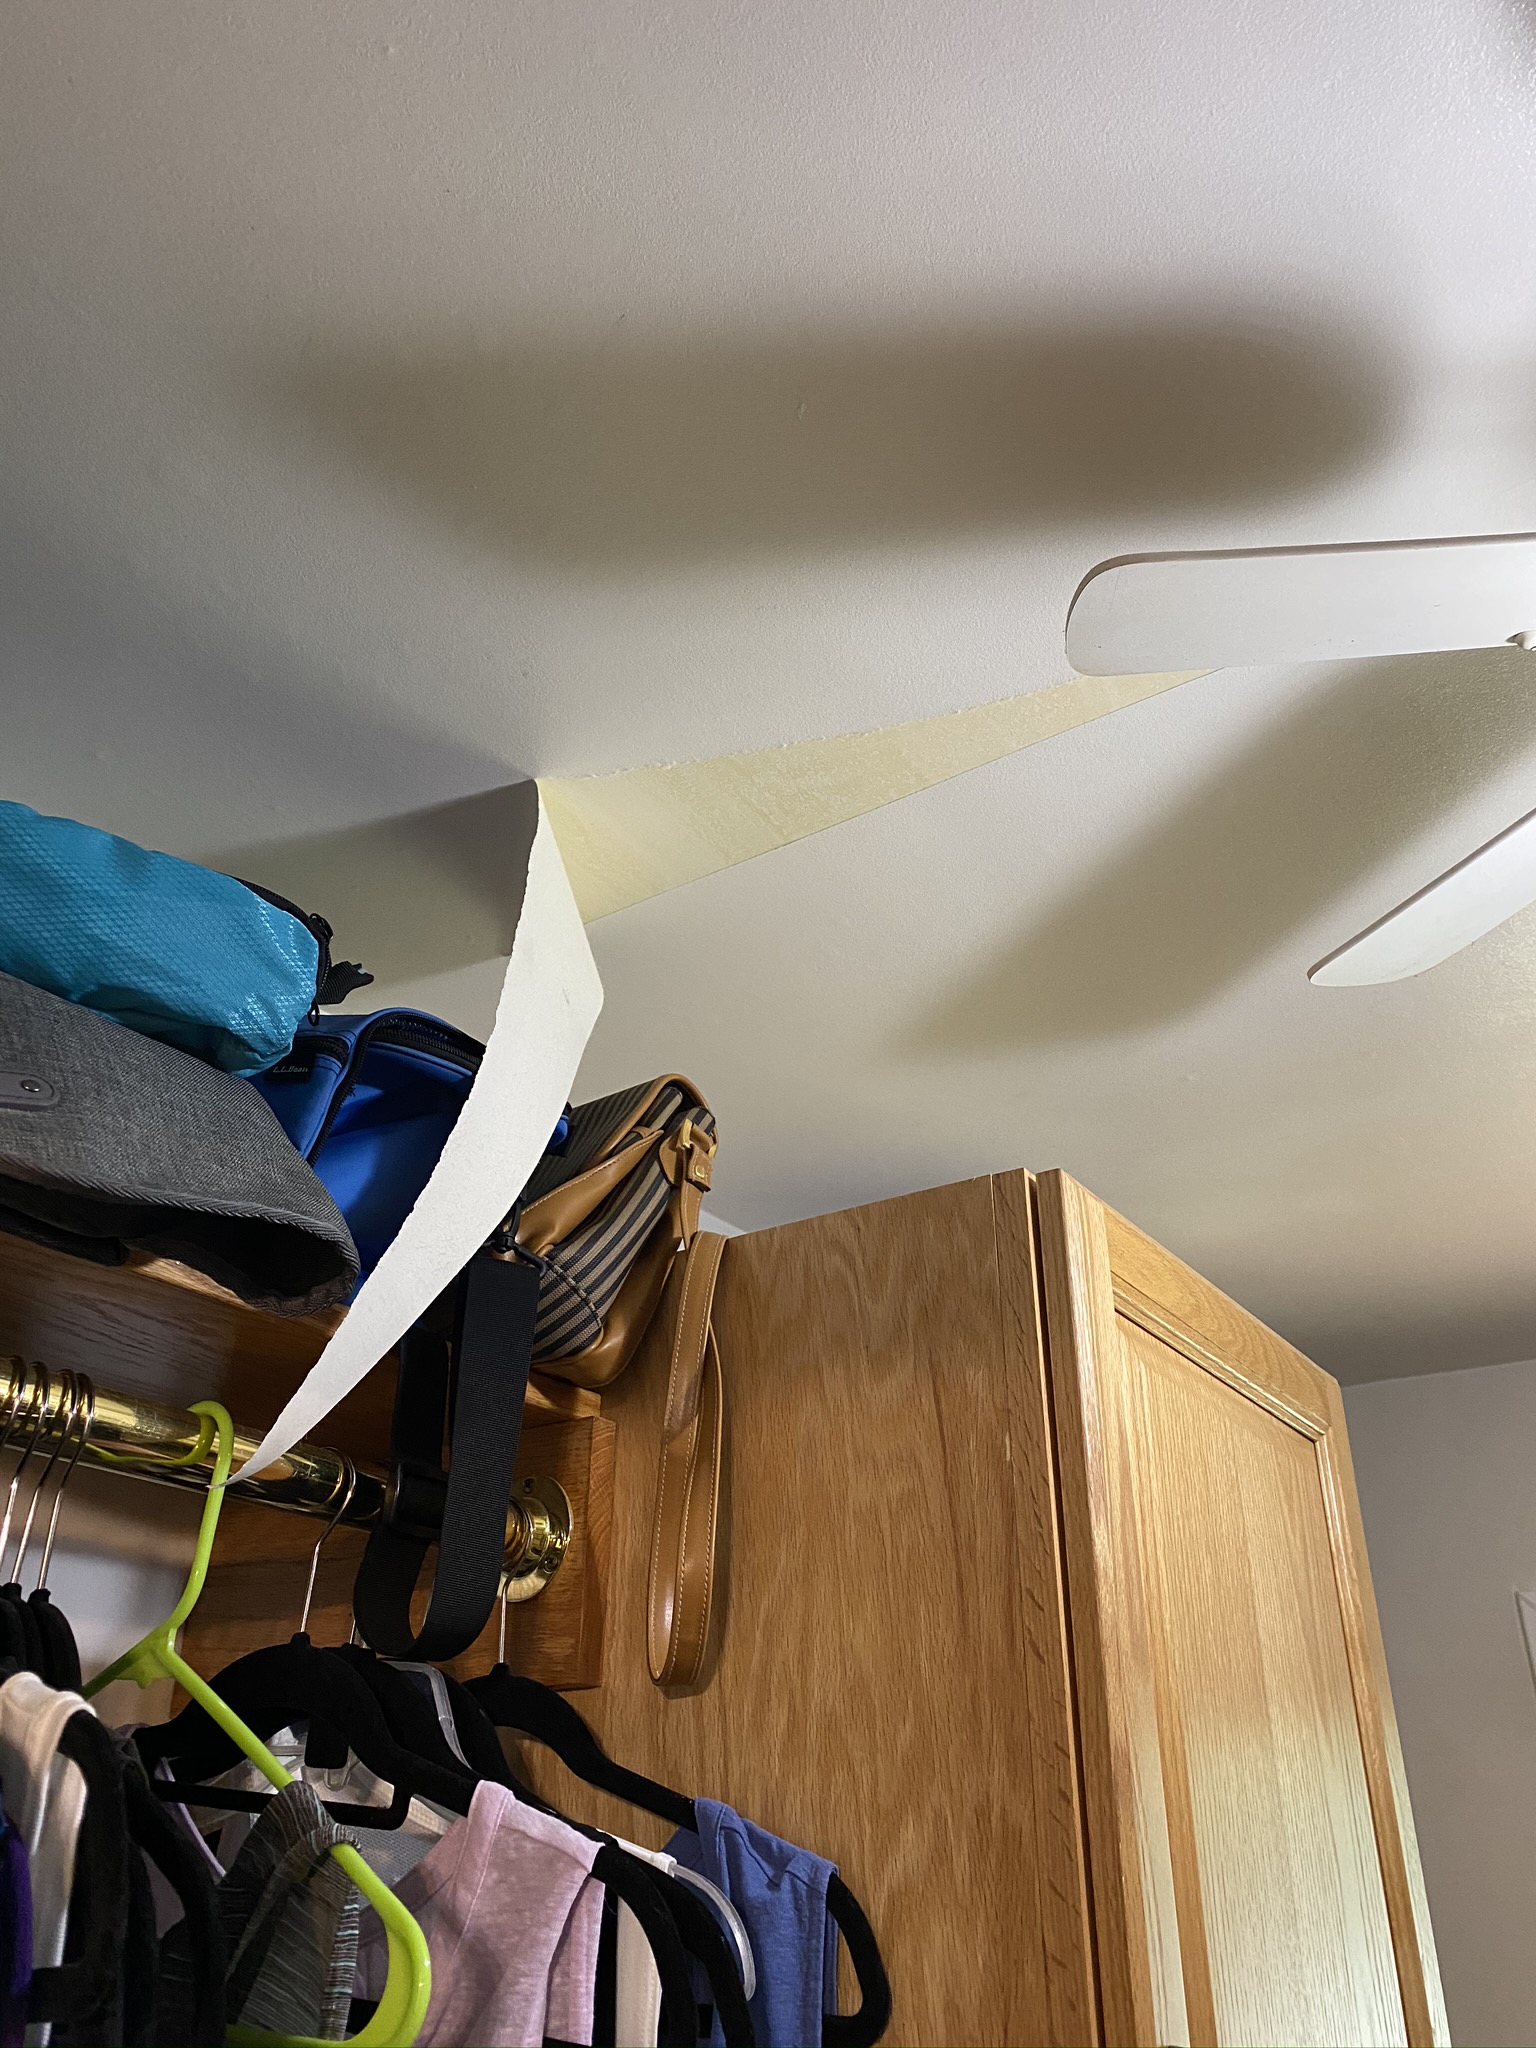
When the hubby went to patch some spots on the ceiling, we learned that it was covered in wallpaper! Just the ceiling, not the walls. We aren't sure why or when this happened, but I just know that it took 6 hours to get it off. It was awful! We used Downy fabric softener mixed with water in a spray bottle, but the putty knife to scrape everything was really the most useful thing. Once it was down, we had a lot of patching to do to repair the ceiling, so our short project ended up being a lot longer. 

Again, we had a good structure, but wanted to paint the wood and take down the heavy brass rods (Does anyone need these? We still have them!). I also didn't have any place to put my shoes, so I wanted to have the hubby build something for them.
You can see that we painted everything and then built the shoe rack on the right side using plywood. 

We painted the doors using the methods that I've previously mentioned (paint additives to make it harder). I also want to mention that 2x4s turned on their sides make great racks to hold cabinets while they are drying.


We used the same flooring in the closet and bathroom as we did in the kitchen. It is waterproof and durable and went well with everything. The chandelier is like the one I had in my old house that I had to leave behind, so my daughters bought me a new one and it is perfect!


We are still working on getting a replacement door, but we went ahead and painted the one that was there and it will work for now. 

I love this area! The hubby installed undercabinet lighting, the wood is a piece of ash that we got from Indy Urban Hardwood. We split that in half and used the other part as a desk top. The mirror was an Etsy purchase from Milltown Merchants.

I've been watching the Home Edit on Netflix, so, of course, I had to add labels to the closet. It really does help a lot though. 

I love my closet...now to work on the other master bedroom closet!


Thursday, July 16, 2020

A little of this...a little of that

During the pandemic shut down, we've been continuing to work on our house, but it is getting harder and harder to stay motivated because it has been 8 months and we still aren't finished with everything. There is a lot to go, but we've decided to start working on the little things that keep us interested right now.

I've been coveting these chairs on Amazon since we moved into the house. I thought that they would be perfect for our sunroom. When we first moved in back in November, they were only $177, but I felt like that was still too much, so I waited. And then they proceeded to go up in price...and up...and up. I finally just broke down and did it because they were exactly what I wanted. 

I also wanted these log tables that I had seen on West Elm. I thought that they would be a great complement to the room, but didn't want to pay that much. Luckily, I live in the forest with a lot of trees that have fallen. AND my husband is a rock star at making things. I ended up with the gorgeous table below. It's got a ton of character and was exactly what I was looking for and he made it in a day! I was super impressed.


Old laundry room

New laundry room. We used the same laminate floor that we used in the kitchen. The counter is a butcher block that we purchased from Lowe's. The shelf is my favorite -- we went to a place called Indy Urban Hardwood. It is an awesome place where they have tons of trees cut in slices for you and they've dried them in their kiln, so you don't have to wait to use them.  The bottom of the shelf is rounded because it is the outside of the tree without the shelf. I really love the way the whole thing came together.


Old bathroom

New bathroom

The vanity is from Wayfair with the faucet from Home Depot. The mirror was ordered from an Etsy Shop and came really quickly. The light fixture is from Lowe's, and the shelves are from Amazon. 

Old mudroom

New mudroom

We got the counter and the bench as raw wood from Indy Urban Hardwood (and it has a beautiful live edge on it). It was stained, sanded, with multiple layers of polyurethane added to it. These are actually from the same piece of wood that we had cut for us at the store. My husband made the bench piece that the wood top sits on top of and the shorter cabinet is just an off-the-shelf one from Lowe's. 

Old deck. Note that there were several holes in the deck and missing pieces of wood on the deck down below.

New deck. We sanded and stripped the paint/stain that was on it previously -- scrubbing with a wire brush really stinks! But we also found that most of the deck is redwood, which is awesome. My husband did burn out the sander that he had, so I would definitely recommend renting a large floor sander to do something like this. We thought that the darker brown fit in with the woods a little more than the previous red color.


One of the things we enjoyed at our old house was a bar top that we had by the pool. We ate dinner out there all of the time. We didn't have anything like that here, and our bar top was too large for the upper deck, so we built this ledge. it is perfect for the two of us and we've had quite a lot of meals here so far. 

We've definitely been keeping busy during the pandemic...but there is still more to come!


Saturday, June 20, 2020

The Kitchen is Finally Done!


Gold walls, 50 year old cabinets, an older and really thick laminate floor characterized our kitchen when we first moved into our new house. We had great appliances though, so we thought we could just paint the cabinets and go from there. However, as things often happen with remodels, that isn't what ended up happening and we had a 6 month long journey to get our kitchen looking like we wanted it to.

We began in January of 2020.

First we ordered all new cabinets from Lowe's, but used the custom cabinet option from KraftMaid. The designer at Lowe's had some great suggestions about layout and we ended up utilizing most of what he designed for us. I hadn't seen it before (but now it is everywhere!), but I wanted white cabinets with a wood island and wood accents. I wanted to have a modern kitchen, but needed to honor the house because we live in the woods.


Once the cabinets came, demo started. We ripped out everything but the kitchen sink because we wanted to use that while we were under construction.

We also ripped up the floor because the cabinets needed to go on the subfloor and not on top of the laminate flooring.

Since we had ordered an island, we also needed to put electricity to it, so our wonderful friend Victor came and did that bit of electrical work for us. We also needed to lower the microwave and move the drink refrigerator and regular fridge, so Victor did all of that electrical work for us as well.


We also had a lot of work to do on the walls to make them look decent and prepare them for cabinets and the eventual back splash. There was wall paper and the backing from the previous back splash that all had to be pulled down which was not fun work.

But it was finally time to start putting up the cabinets and that was awesome!


My husband constructed these all important supports that helped us hold the cabinets up while we were putting them up on the wall. 


Here is one important thing that I would mention about putting the cabinets up -- we tried and tried and couldn't get the screws to go all the way through the cabinets and into the walls. So after doing a little reading online, I found out that you needed screw wax, but we couldn't find it anywhere. Then I found you could use the wax ring that is usually used for toilet bowls as the screw wax and it worked great! We used two of them for all of the screws that we had to put in, but it was super cheap!

We added a desk into part of the dining room because we didn't have an office. The cabinet people tried to talk us out of it, but it is one of our most used spaces. We have a large screen mounted to the wall and we just love it. And isn't the mail slot cute?


We also had to add a pantry because we didn't have one at all. The double stacked cabinets next to the desk give us a ton of room for all of our goods.


This is also my dream kitchen and I love to cook, so we did all sorts of custom builds with a spice rack, double-decker cutlery drawer, and a pull out pantry.


Once the cabinets were in, we had to order the counter tops. We used plywood for quite a while in the meantime.


You can also see the handles that we ordered. FYI - Amazon has handles for much cheaper than the hardware stores do. We ordered these and saved a lot of money over what we would have paid somewhere else and the quality is excellent.


The new sink and faucet came from Costco and is a Kohler. I loved the one big sink basin, but I didn't really want to go with a apron style sink. I liked the clean modern lines of this one.


All of this took until the end of February, then tragedy struck. While my husband was cutting the crown molding to put above the cabinets, he used a table saw in a way in which he shouldn't have, and it ended up pretty much mangling his right hand. We had to call 911 and he was taken by ambulance to the hospital where he had emergency surgery. My daughter had actually done her surgical rotation with the doctor who performed my husband's surgery and said that she was one of the best. He ended up losing a couple of tips of his fingers, but after months of rehab and doctor visits, he is back to doing work just like he did before.  (Please note the barbecue sauce that he is pointing to!)

Big thanks to Steve who helped us finish the crown molding! We couldn't have done it without him!


Also -- I bought him these little Table Saw tools that help you push the wood in so that your fingers don't get close to the blade. I knew he would use the darn table saw again! I know you can get tables saws that have automatic stops on them, but they are a couple thousand dollars! I guess it would have been cheaper than the surgery in the long run though.

It was now March and COVID-19 struck. We couldn't go out to get the supplies we needed to keep working on the kitchen, but then we talked to the place where we wanted to get the floor and they said that they would do all contactless pickup. So we did that.
 
The flooring is Stonescape Mountain Mist from Provenza: a laminate and 100% waterproof. Although we wanted to, we couldn't really do a wood floor because it wouldn't match with the wood in the rest of the house (still not done).

We decided to add a bar to the island with a curved edge. We got Radianz MontBlanc Snow quartz from Peak Stone Company.  It's got little sparkles in it and looks so good with the under cabinet lighting.


The last thing was to install the back splash. We decided to go with a light gray glass tile - 3"x 12" with a silver colored grout. Instead of the typical tile adhesive, we used MusselBound Adhesive Tile Mat and it was amazing! It was so much easier to use than the other type of adhesive. I would highly recommend this for any wall tiling.


We also used Armacost under cabinet lighting from Home Depot.

The finished product!


Friday, May 1, 2020

Hutch makeover -- because the kitchen isn't done yet!


Maggie (but we are really looking at the hutch in the back)
I told you that we haven't been able to completely finish any rooms in our house makeover, but we have been working on small bits and pieces. The hutch in the background is one thing that we finished that I just love. I couldn't find any other before pictures of it because it wasn't initially a huge project, but once we got the kitchen cabinets in, I really wanted to get this to match everything else.

We got all new custom kitchen cabinets, but the built-ins in the dining room were KraftMaid custom cabinets with drawer pullouts that were really nice. The only problem is that they were in that darn medium oak.

My daughter doing some work on the back wall.
I've painted cabinets before and they turned out OK, but I wanted to do some research to find a process that worked really well. I was searching and found some valuable information from This Old House. First there was a YouTube video, then I find an article from This Old House that told of two products that were crucial in painting cabinets: Crown QT Latex Agent Hard Coat by Crown and XIM Advanced Technology UMA Bonder and Primer/Sealer. Of course, I can now no longer find the original This Old House article, but at least I remembered what to do with the products.

After cleaning the wood of the hutch and sanding it down, we used two coats of the primer because it seemed rather thin. This is a bonder and primer/sealer, so the article said that it would really help the paint adhere to the cabinet and result in less chipping. That was important to me because when we have painted in the past, we had some minor chipping and I really wanted the hutch to look as nice as the kitchen cabinets.

After the primer, we sanded with a 120 grit sandpaper and made it smooth. Then my husband used his amazing paint sprayer (I love that thing!). We mixed the Hard Coat in with the HGTV Home by Sherwin-Williams semi-gloss paint that we got at Lowe's and sprayed it on the cabinet doors. We used a foam roller to paint the wood on the actual built-in part of the cabinet.

We then purchased our cabinet handles from Amazon. If you haven't purchased cabinet handles from there (or door knobs or really any hardware needed), it is so much cheaper than any place I have found and the quality has been tremendous. We got all of the doorknobs and hinges from my previous post at a fraction of the cost from Amazon -- and I love how nice it looks.

The bonder/primer/sealer and the hardcoat made such a difference. The cabinets feel like we purchased them that way and the finish looks great. I know there are other products that are similar, so I would highly recommend this process of using the bonder, then adding a hardcoat to your paint.

We got a counter top that matches the kitchen and I absolutely love the way the whole project looks. It matches the kitchen (which is blog post that is coming soon!) and really modernized the dining room.
The finished hutch in the dining room


Wednesday, April 29, 2020

Door makeover

Spring at the new house (photo credit: Kayla Young)
I've taken a bit of a break on the blog because it seems like we haven't been able to finish anything. We've started a ton of stuff, but just can't finish because of a ton of things: a terrible bout of food poisoning for me and my daughter, a worldwide COVID-19 pandemic means that we often can't get supplies because we don't want to go inside of a home supply store...and there was that small incident with a table saw and my husband. OK - it wasn't a small incident, he lost the tips of a couple of fingers and mangled a couple more. He is doing much better now -- thanks to amazing doctors who did a great job putting his hand back together. His fingers are a little shorter, but they still work, and he is back to work on the house. We are very thankful that all turned out better than we had hoped.

As I get back to writing about what we are doing with our house, I decided to start with something that I've been wanting to change...our interior doors. The doors are flat and wood with brass hinges and gold doorknobs. The optimal thing to do would be to replace the doors, but evidently it isn't that easy. In order to replace the doors, you really have to replace the whole door frame and door. And the doors that look really nice are about $400 each. In just the downstairs area, there are four doors ($1600!), so we had to come up with a different solution. We could purchase cheap doors with the frame at around $100, but the doors were just cheap builder grade and really weren't what we wanted.

Then the husband came up with an incredible idea. He took small pieces of wood trim and built a new part of the door. By the way, he isn't allowed to use a table saw anymore, so this was done with a simple miter box and a hand saw. He used his nail gun to attach the trim pieces to the door, then we used wood putty to fill those holes.

Miter box used with a hand saw
Trim attached with nail gun
Then the hubby used the paint sprayer to spray on two coats of Kilz Hide-All Interior Primer, then two more coats of Valspar Signature Ultra White Satin Paint. We had to do that many coats on each side to just to cover the wood, but when we got finished, it looked amazing!

The hubby only wanted his hand in the pic -- it's the one with the shorter fingers!


My daughter had a great idea to get black door knobs and hinges and it was a great decision. Amazon had great prices on both the doorknobs and the hinges and we didn't have to go inside of the store - bonus!

My daughters are very excited to finally have doors on their bedrooms and bathroom! They've been staying with us during the pandemic and have been without doors for about 2 months now. They are ecstatic to have a little privacy and I'm thrilled with  the way that these turned out.

Total cost per door = $25 (not including paint because we already had that). That's a lot better than $400 each and I think they look fabulous!